

In this step-by-step tutorial, you will learn how to create and deploy an ERC-20 token on Ethereum.
We will use Metamask and Remix IDE for this tutorial.
What is ERC-20?
ERC stands for Ethereum Request for Comment
An ERC20 token is a standard used for creating and issuing smart contracts on the Ethereum blockchain. It was proposed in November 2015 by Ethereum developer Fabian Vogelsteller. ERC-20 defines a common list of rules for Ethereum tokens to follow within the larger Ethereum ecosystem, allowing developers to program how new tokens will function in this ecosystem. This also allows developers to accurately predict interaction between tokens. These rules include how the tokens are transferred between addresses and how data within each token is accessed. Most tokens on Ethereum comply with the ERC-20 specification. Following a standard like ERC-20 allows application developers which use ERC-20 tokens to easily support all ERC-20 tokens without having to write specialized code for them individually.
Prerequisites
- Download and installed Metamask.
- Select the Rinkeby Testnet network to work with
- Request some testnet ether on Rinkeby through any one of this faucet:
Once This is done, let's get started!
Writing the code
We are using Remix IDE to write the smart contract.
In Remix, create a new contract file, I named mine ZQToken.sol - you can name it whatever you want!
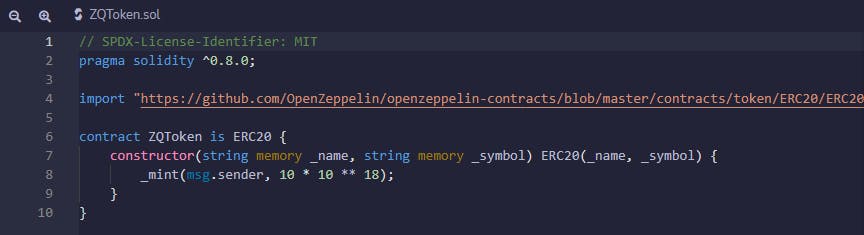
In the contract, write the following code:
// SPDX-License-Identifier: MIT
pragma solidity ^0.8.0;

import "https://github.com/OpenZeppelin/openzeppelin-contracts/blob/master/contracts/token/ERC20/ERC20.sol";

contract ZQToken is ERC20 {
    constructor(string memory _name, string memory _symbol) ERC20(_name, _symbol) {
        _mint(msg.sender, 10 * 10 ** 18);
    }
it will look like this
 Let's break it down line-by-line for better understanding:
pragma solidity ^0.8.0;
This line specifies the compiler version of Solidity to be used.
import "https://github.com/OpenZeppelin/openzeppelin-contracts/blob/master/contracts/token/ERC20/ERC20.sol";
This line imports the ERC-20 token standard from OpenZeppelin (OZ). OZ is an Ethereum security company. You can look at the implementation of ERC-20 standard contract if you want by following the link - github.com/OpenZeppelin/openzeppelin-contra..
contract ZQToken is ERC20
This specifies a new contract, named ZQToken, in our Solidity file. ERC20 in this case refers to the standard contract we imported from OpenZeppelin.
{
    constructor(string memory _name, string memory _symbol) ERC20(_name, _symbol) {
        _mint(msg.sender, 10 * 10 ** 18);
    }
We created a constructor function that is called when the smart contract is first deployed. Within the constructor, there are two arguments which specify the name and symbol of our cryptocurrency. E.g. name = ZQToken, symbol = ZQ.
After specifying the constructor function, we call ERC20(_name, _symbol).
The ERC20 contract we imported from OpenZeppelin has its own constructor, which requires the name and symbol parameters. Since we are extending the ERC20 contract, we need to initialize the ERC20 contract when we deploy ours.
Therefore, we are providing _name and _symbol variables to our contract, which we immediately pass on to the ERC20 constructor, thereby initializing the ERC20 smart contract.
mint This function sends an amount of newly created coins to another address. It takes two arguments, an address to mint to, and the amount of tokens to mint.
10 * 10 ** 18
specifies that you want 10 full tokens to be minted to your address.
Note:
10 ** 18
(which is actually 10 ^ 18). ERC20 tokens by default work with 18 decimal places. So 1 full ZQToken in this case, is actually represented as 10 ^ 18. Therefore, to get 10 full ZQTokens, we use
10 * 10 ** 18
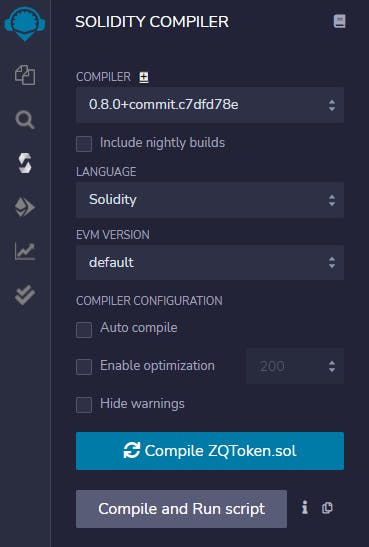
Compiling
Open REMIX IDE
Go to the Solidity compiler tab select ZQToken.sol and click on compile
Deploying
Go to the Deployer tab in Remix.
Select the Injected Web3 environment (ensure you are on the Rinkeby Test Network), and connect your Metamask wallet.
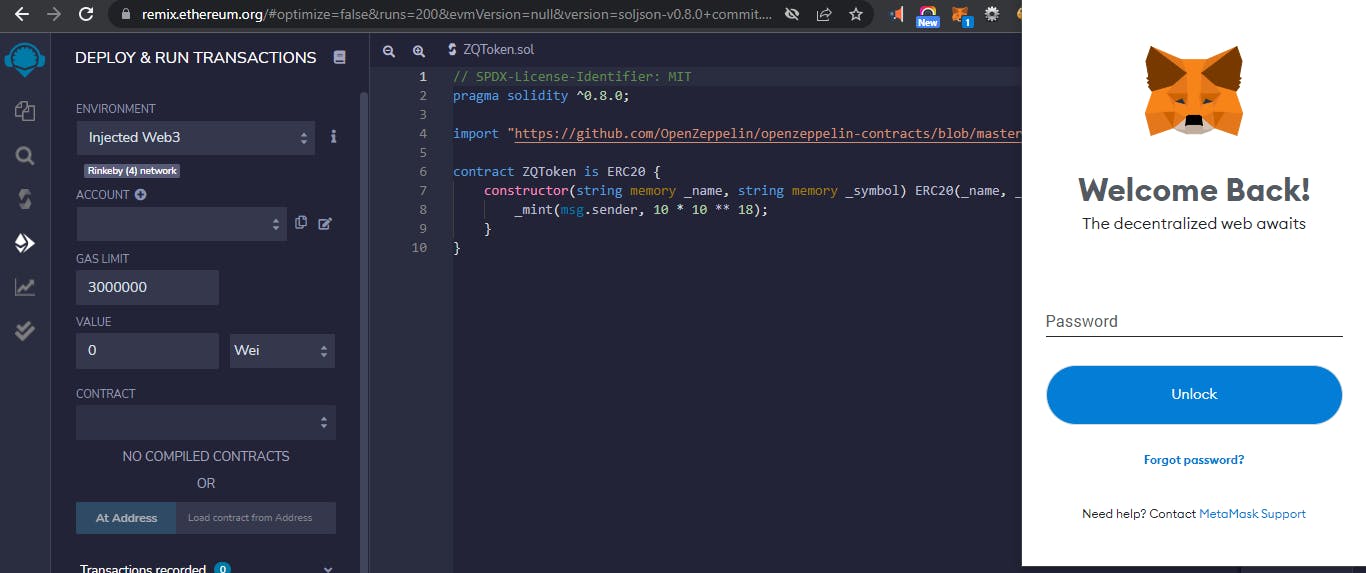
- Select the ZQToken.sol contract, and enter values for the constructor arguments _name and _symbol under the option 'deploy' Click Transact and approve the transaction from Metamask to deploy your contract!
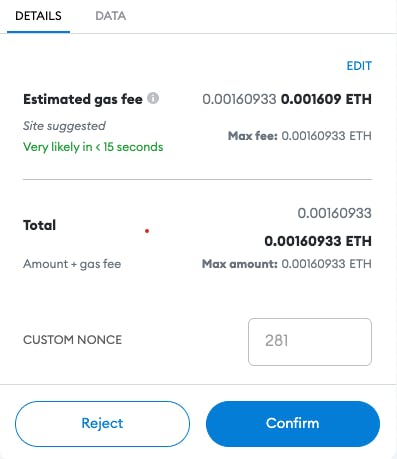 A metamask notification like this will pop up.
When deployed, the contract should show up under the Deployed Contracts section. Click the Copy Address button to copy the contract address.
A metamask notification like this will pop up.
When deployed, the contract should show up under the Deployed Contracts section. Click the Copy Address button to copy the contract address.
CONGRATS YOU'VE CREATED YOUR VERY OWN TOKEN!
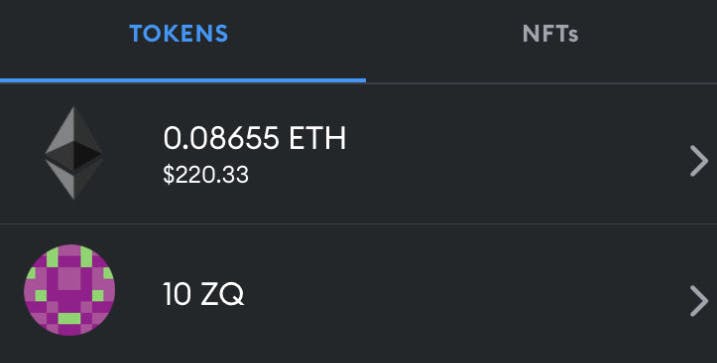
You may notice that even though you minted tokens to your address, they don't show up in Metamask.
How To View Tokens On Metamask
- Copy your contract address
- Open Metamask and click Import Tokens in the Assets tab
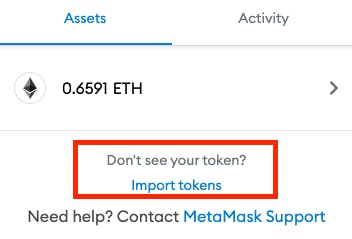
- Enter your Token Contract Address, and it should detect the name and number of decimals automatically
- Click Add, and you will see your balance in Metamask!